How to add a “confirm your email” field to your Marketo form to verify/validate that the original “email address” field is correct – a step-by-step tutorial
Marketo makes it very easy for marketers to build forms within minutes. This feature offers incredible resource-saving opportunities when you think of the time it would normally take to program from scratch moderate-to-complex web forms with the help of IT developers versus using the automation platform’s drag-and-drop functionalities.
Using the Forms 2.0 framework, Marketo specialists can easily add condition-based hidden form fields, include rich text anywhere in a form, and even quickly redirect form fillers to different thank you pages based on certain user-provided information.
Not only that, Marketo forms also offer useful out-of-the-box validation for most fields, including phone numbers and emails.
One thind that does not come readily available is the ability to add a “confim your email” functionality. And in this blog, I am going to show you how to easily do just that.
I will show you how to build this functionality for your Marketo form in 5 easy steps:
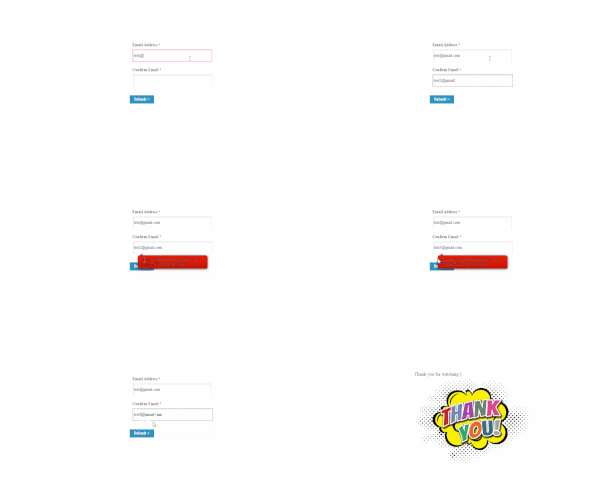
1.Create a new field in your Marketo fields section (admin access required).
Name it appropriately based on your best-practice naming conventions followed in your organization. Let’s say the field’s name is “Confirm Email”.
2. Start building your form and add the newly created field after the main “Email Address” field.
You can add as many fields or rich text elements as you need to – nothing new or complicated at this step of the process. The only extra step at this moment in time is to make sure that you have 2 email address fields next to (following) each other in your form – the first one will serve as your main email address field, and the second one – as your email confirmation field.
NOTE: In this example, I will not be using the Marketo primary email field. I will be using a “Secondary Email”. Many organizations choose to do that for various reasons, including, to protect the original email address field from being overwritten.
3. Add your form to a Marketo landing page
Follow the usual process of embedding your form on a Marketo-built landing page. For the purposes of this exercise, I will be using a generic blank Marketo template to build my page.
4. Publish your page and when viewing in your browser, right click anywhere on the page and select “View Page Source” from the menu that will pop up
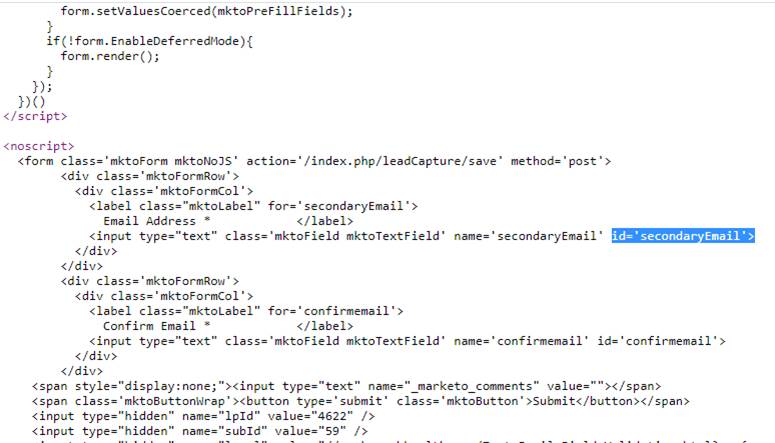
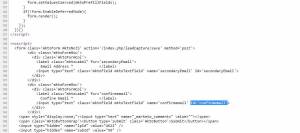
Why do you need this step? To run the validation, we will need to add a simple, but important Javascript code. To make the code work, we will be using the IDs of the fields, not their names. To find these easily, we need to look at the page view source, so we can quickly locate the form IDs of the two email address fields. It is important to copy these values, which we will then paste into the javascript code that I will share further down below.
For this example, I will be using:
- “secondaryEmail” as my main email address field and
- “confirmemail” as my second email address field
In these screengrabs, you will see how to find the ID values of these fields:
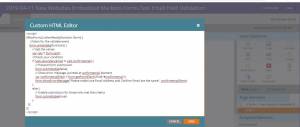
5. Go back to edit your landing page. While in “edit” mode, drag an HTML element onto the page, and in it, copy and paste the following simple Javascript code, making sure that you replace my email field IDs with yours – I have hilighted what you need to change in red color:
§§§§§§§§
<script>
MktoForms2.whenReady(function (form) {
//listen for the validate event
form.onValidate(function() {
// Get the values
var vals = form.vals();
//Check your condition
if (vals.secondaryEmail != vals.confirmemail) {
// Prevent form submission
form.submittable(false);
// Show error message, pointed at confirmemail element
var confirmemailElem = form.getFormElem().find(“#confirmemail“);
form.showErrorMessage(“Please make sure Email Address and Confirm Email are the same“, confirmemailElem);
}
else {
// Enable submission for those who met the criteria
form.submittable(true);
}
});
});
</script>
§§§§§§
- In blue, you will see the error text that you can edit to make sure that the form displays your desired error message on validation.
- Save your HTML element, which will be invisible to front-end users.
- Approve you page and open it to test how your form works now. You are all set.
Conclusion
I hope that you found it easy to add email confirmation to your forms using my little workaround. With a bit of Javascript, you can actually add validation to other Marketo fields as well. The Marketo development team has provided a lot of examples that you can use here. I certainly used one of them by adding a few modifications to build the “email confirm” validation that I am sharing now.
This simple validation enables you to make sure that your audiences enter a correct email address when filling out your forms. It helps reduce email address errors and is a useful feature that you can add to your process at any point in time.
Thank you for your time.

