Track banners and buttons on your website to increase conversions. Measure how calls to action resonate with your website visitors and drive ROI by optimizing form-fill, clicks, and purchase results.
Read on if you want to know how to generate tracking tags, add them to your buttons and banners, and watch the clicks, impressions and conversions mount as your visitors engage with them.
In this brief tutorial, I am going to show you how I tagged 2 of our homepage buttons and how I was able to measure the views these buttons generated in just a few minutes, right in my Google Analytics reports. Really exciting!
1. Why Track the Buttons and Banners on Your Website?
If you look at your website, you will see that you have numerous buttons, calls to action and banners. Do you know which one is the best performing one? Which asset is bringing you the best conversions?
You want to track how your assets are performing, so that you can replicate your successes and drive even better results in a cost-effective way.
You also want to see if your offer and promotion optimization efforts work – if people click on your optimized assets, if they engage, and – in case you are running an eCommerce site – if these assets generate greater conversions and even revenue.
2. How to Set up Tracking for Banners and Buttons on Your Web Properties?
If you are looking to generate analytics insights regarding your button and banner performance across your owned sites, here is your quick recipe for success – the three steps are described in detail further down in this blog.
a. Tag the link of your banner/button with the special Promo tags that are available to you
- You will want to do that using the four Promo tags listed further below, which help Google Analytics record button and banner performance.
b. Make sure you have set up the Internal Promotions report via the eCommerce suite in Google Analytics.
- Google Analytics is offering the Internal Promotions as part of their eCommerce suite, but you don’t need to have an eCommerce site to track your promotional buttons and banners. And you don’t have to pay extra to have this feature enabled.
c. Prep your GTM (Google Tag Manager) to be able to track your buttons and banners.
- Internal promotions are a great opportunity to check whether web visitors engage with the creative assets on your website or which calls to action are creating the best returns on your marketing investments.
- But to make sure that tracking has been enabled, a few modifications need to be made in your Google Tag Manager.
Tracking setup steps
1. Here are the 4 internal promotions tags that you need to use for your banner/button tracking:
- promo_name=enter your banner name
- promo_id=enter your banner id
- promo_creative=enter your creative type
- promo_position=enter the position of your banner
Please note – internal promotions tagging is not to be confused with external campaign tagging, which always employs the use of UTM tags. If you are unsure about the difference between the two, please check out this quick and easy-peasy presentation.
2. Here is how you need to add your promo tags to your banner/button links:
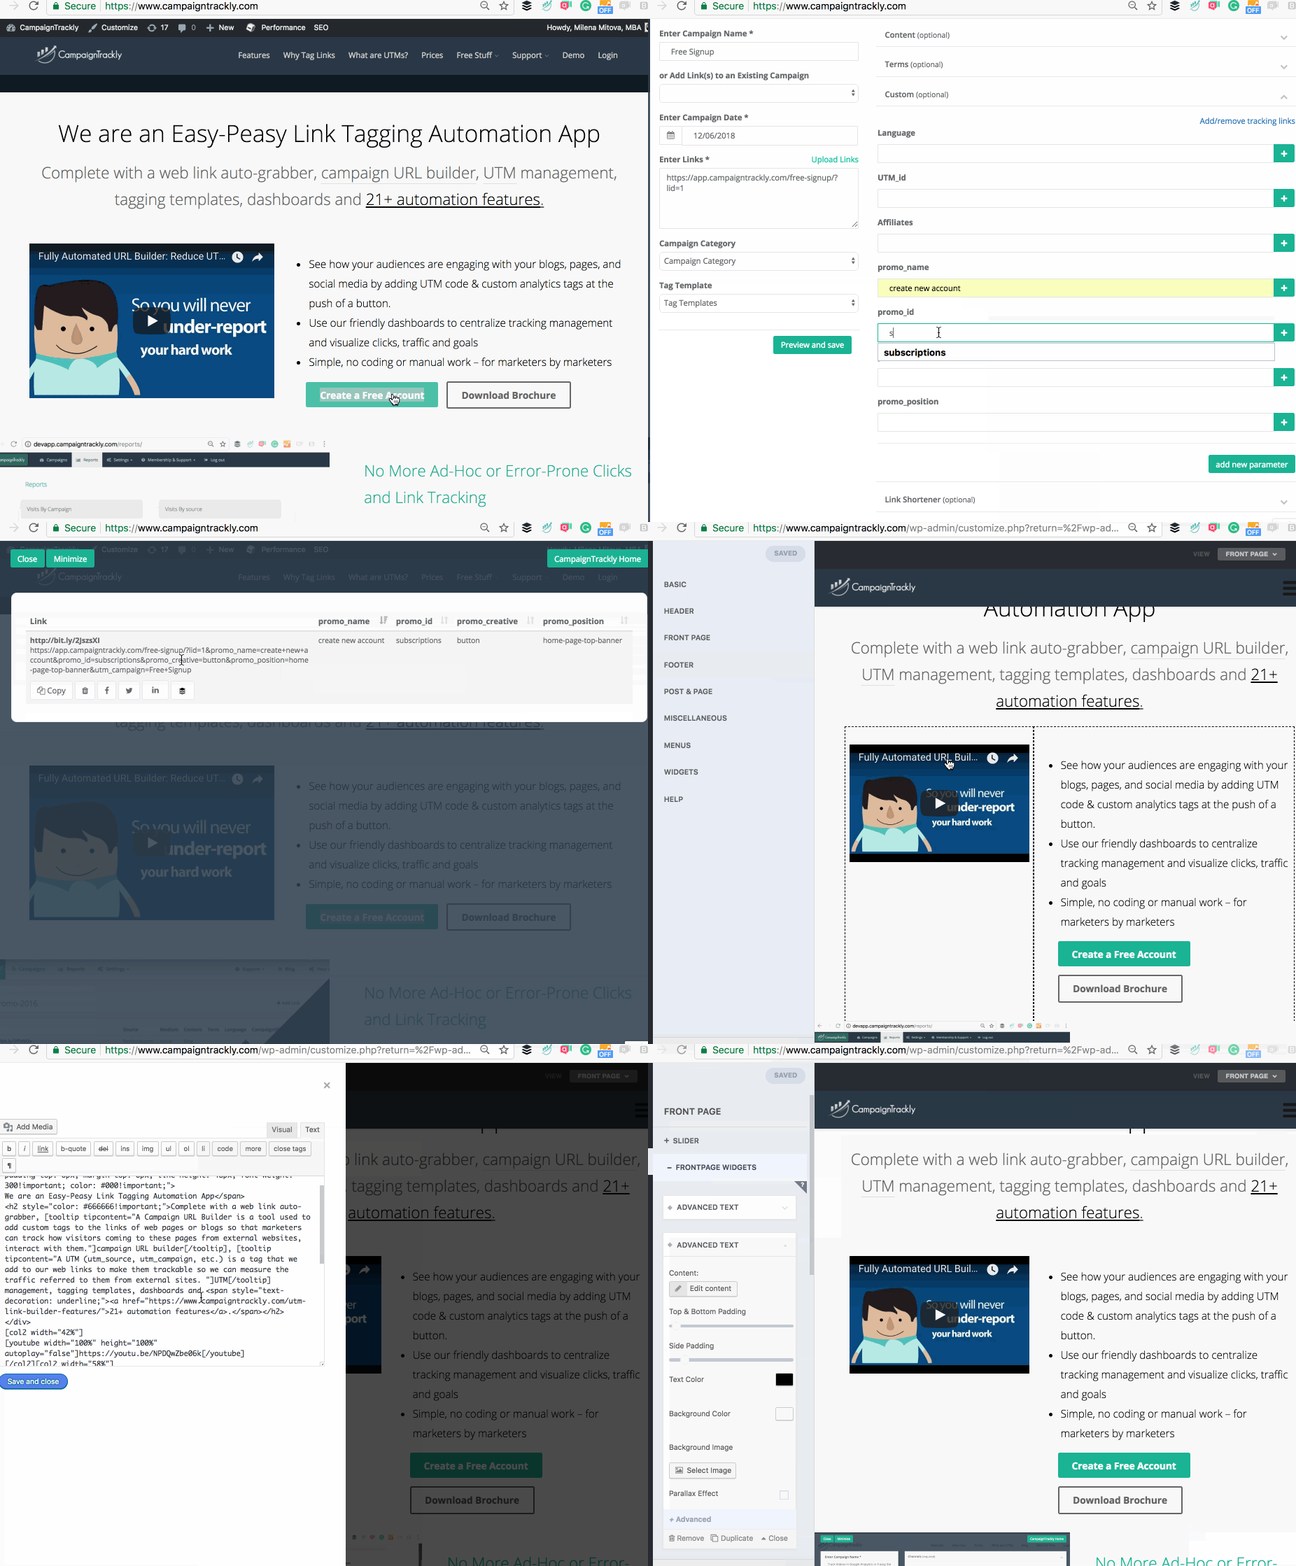
Let me show you how I added the above internal tags to the 2 buttons on the top banner of campaigntrackly.com’s home page.
- Below are the buttons that I decided to track – I wanted to see if people were clicking on them:
![]()
- Here is a short animated gif that shows you how, using the CampaignTrackly app, I generated my tagged links in no time and added them to our website:
- Once your links are ready, make sure that you use them for your buttons or banners instead of your original non-tagged ones.
3. Here is how to set up your Analytics tools to track your internal promotions
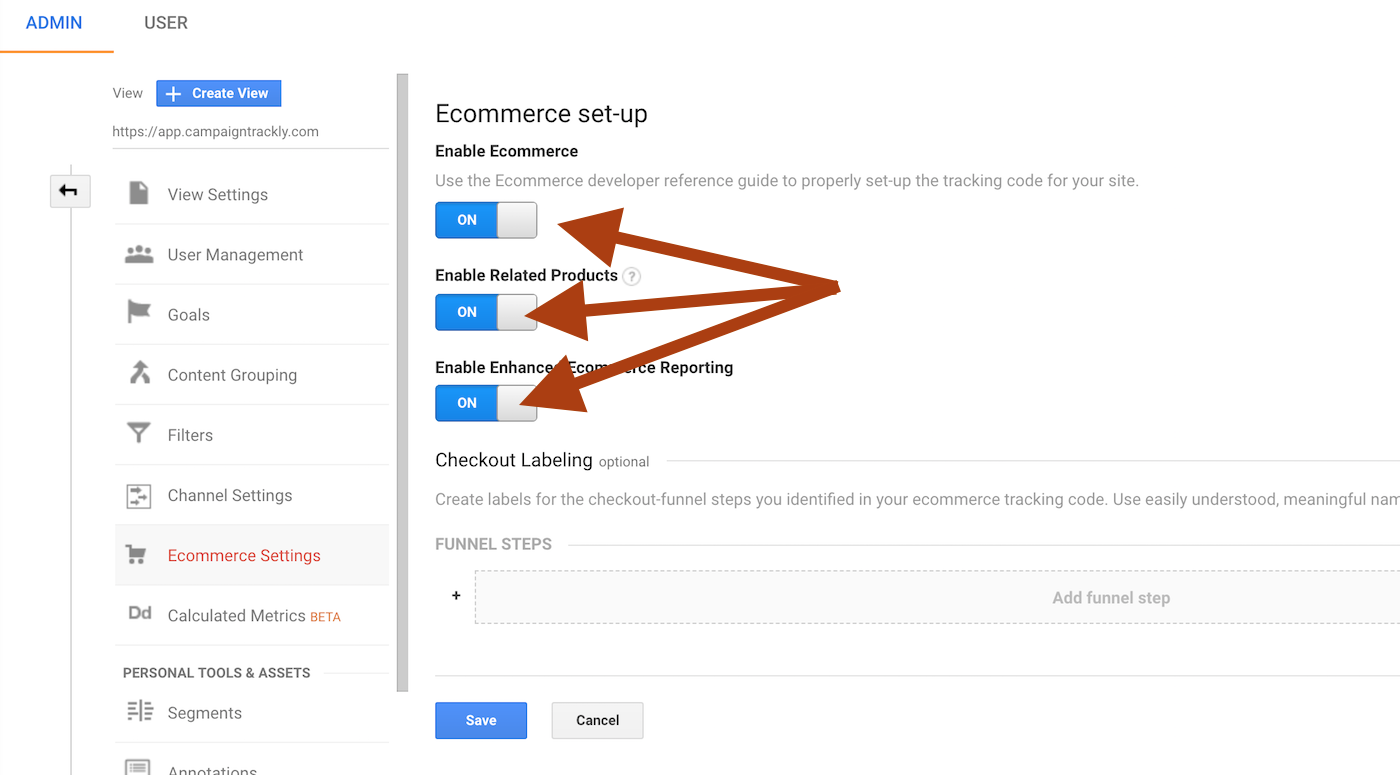
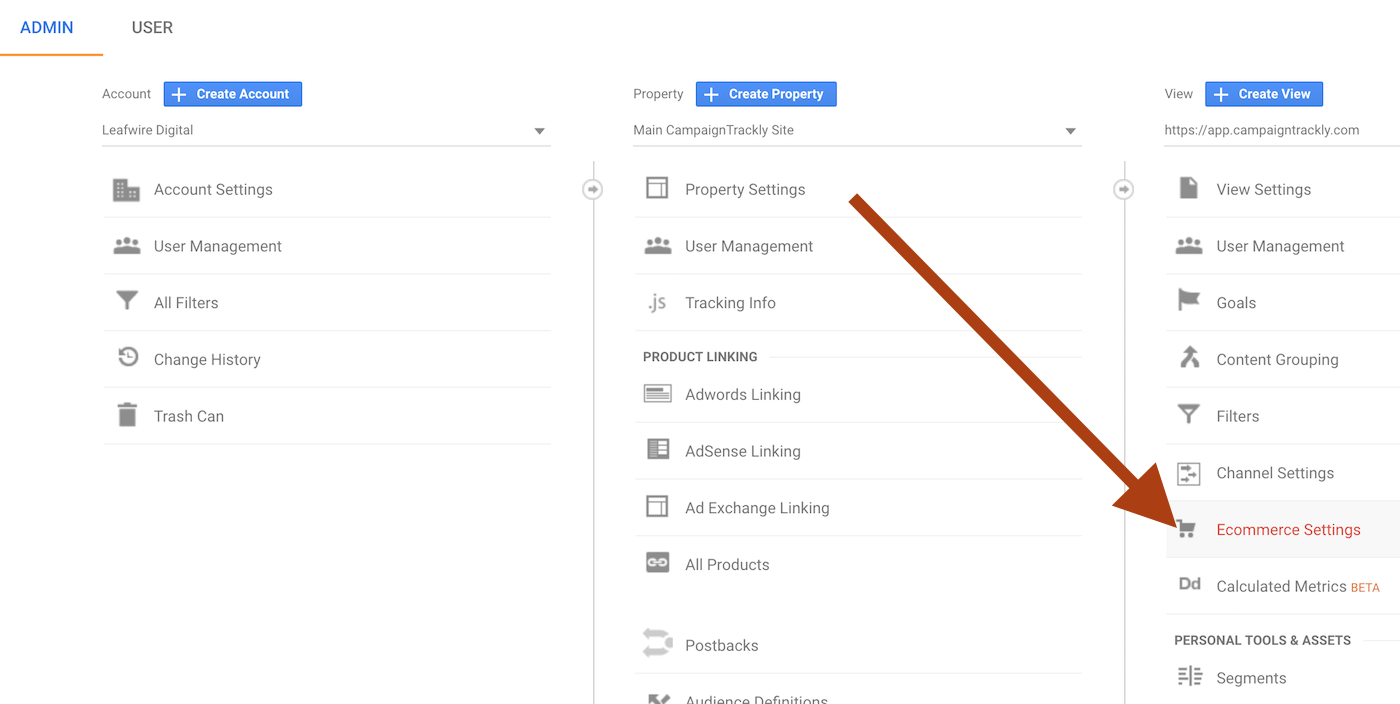
- Step 1: You need to make sure that you do enable your Enhanced eCommerce feature in GA. Even if you don’t use eCommerce, you need to set it up to be able to track internal campaigns. This step requires that you have admin access – If you don’t, reach out to your Google Analyst or account owner and task hem to set up this functionality. See how to do that:
 [/slider]
- Step 2: You will need to tell your Google Analytics platform to track these internal promotions, otherwise, nothing will happen in your reports dashboard. There are several ways to “tell” GA to do that – it very much depends on the tracking technique you are using.
- You set up two tracking variables (for views and clicks) with their related tags and triggers in Google Tag Manager – here is a bit longer example that I found helpful.
- You can also apply the method explained by measureschool.com in this blog – I used it successfully with a few modifications and it worked well for me.
How I implemented the process for my CampaignTrackly’s home page buttons
- I created two new “Custom Javascript” Variables in Google Tag Manager (GTM) – one for my button views and one for the clicks.
- I already have GTM set up to work with Universal Analytics to track my website, so now any time I need custom tracking, I just set it up directly in GTM.
- Below you can see the “view” code I used. If you are trying to replicate it, you will need to change your buttons/banners’ name, id, position, and creative info:
“““““““““`
function(){
return{
‘ecommerce’: {
‘promoView’: {
‘promotions’: // Array of promoFieldObjects.[
{
‘id’: ‘subscriptions’,
‘name’: ‘create-new-account’,
‘creative’: ‘button’,
‘position’: ‘homepage-top-banner’
},
{
‘id’: ‘features’,
‘name’: ‘see-studio-report’,
‘creative’: ‘button’,
‘position’: ‘top-banner’
}
]
}
}
}
;
}
“““““““““““`
- Here is a screengrab of my code in GTM:
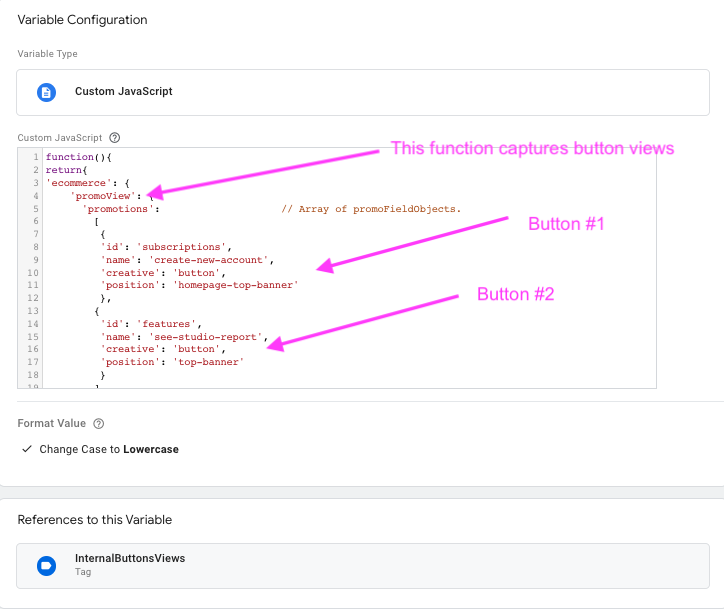
This screengrab shows the custom javascript code used to set up tracking of the views of my 2 home buttons
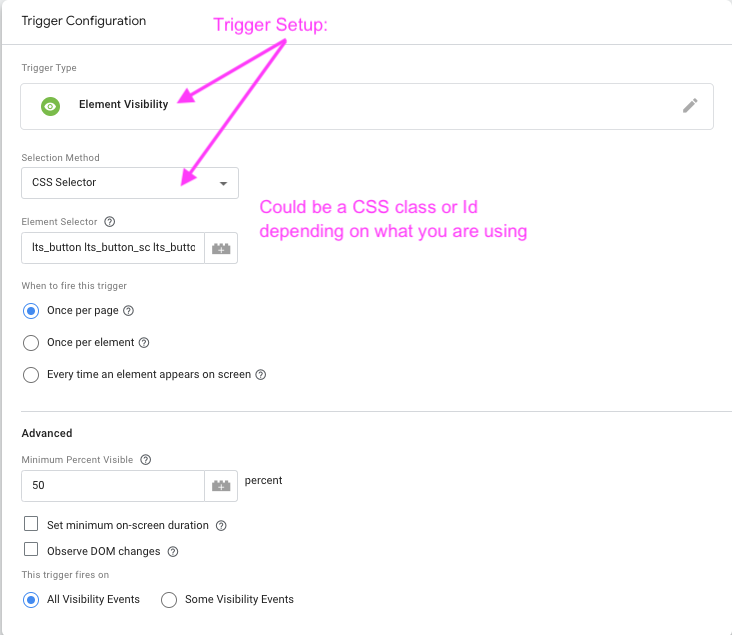
- As a next step, I created a view tracking tag and a trigger for my variable – see my configuration in the image below:
This screengrabs shows how I have setup the tag and trigger associated with the view button custom javascript variable
- I have set up the trigger in the following way – my button identifier is based on a CSS class, but you can select special image or banner ID as well:
- Once you are done implementing the variables, tags and their triggers, it is important to test, using the GTM tag Chrome extension, to make sure everything works correctly.
4. When everything has been put in place, it is time to check your reports
- In your Google Analytics Reports, just go to Conversions>eCommerce>Marketing>Internal Promotion. As you will see from the image below, the Create New Account button seems to be doing very well, whereas the studio report and features – not so much. This tells me that I probably need to change my offering or maybe spruce up my calls to action:
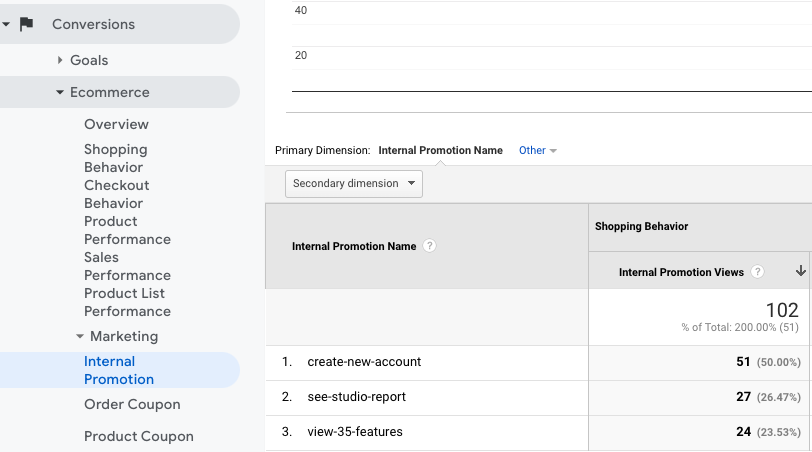
This is the report in Universal Analytics that shows you Button/Banner performance
- A reminder: you will need to set up separately clicks and views to be able to track both actions effectively – see the image below recording separately clicks and views when I tested my setup:
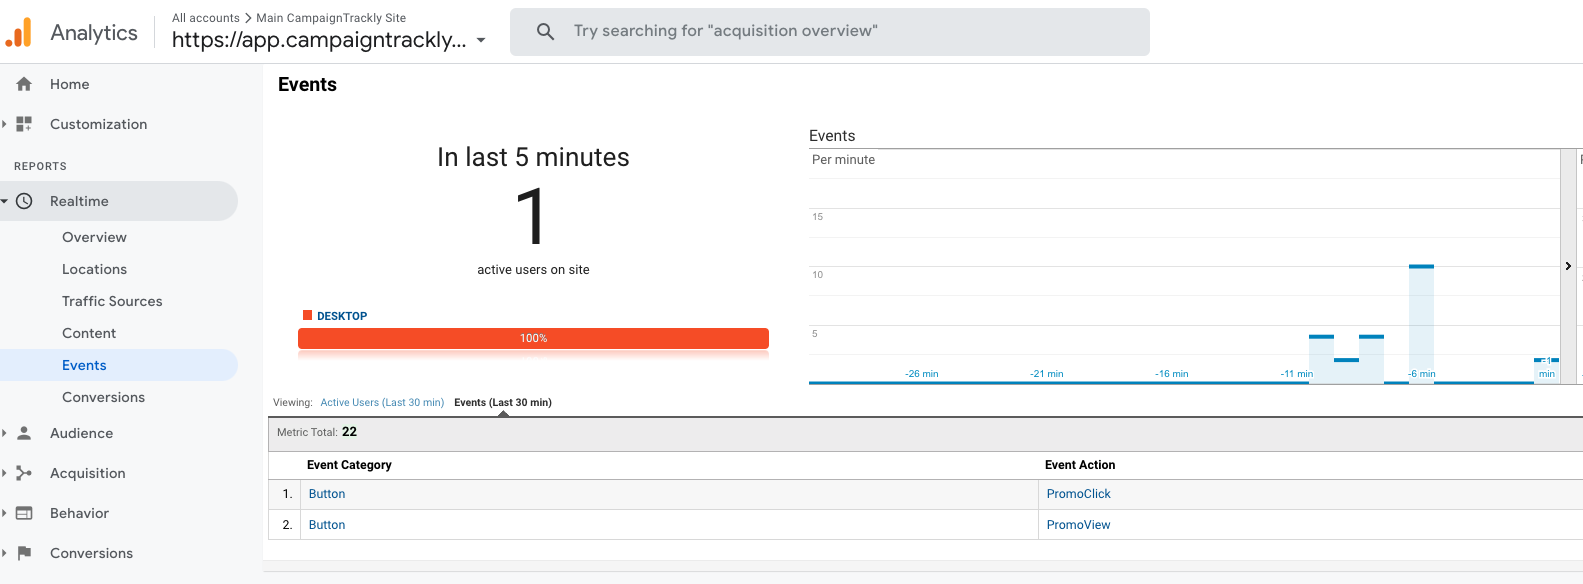
This is real-time test of my click and preview button tracking setup
7. In Conclusion
As you saw from the example above, you need to track your internal promotions and campaigns if you want to understand if they are helping increase your site stickiness and conversions.
The insights you can collect from tracking internal promotions can help you understand your customers and their preferences, so that you can provide superior experiences and drive more engagement.
It is important to note that your GTM set up can be done once and you will only need to take care of the promo tags whenever you change links and creatives, which can be easily done using an excel spreadsheet or a link tracking automation tool like CampaignTrackly.
Any questions or comments, email me at support@campaigntrackly.com.
[callaction button_text=”Create a FREE Account” button_url=”https://app.campaigntrackly.com/free-signup/?lid=1″ background_color=”#1AB394″ text_color=”#ffffff” button_background_color=”#F00″ button_text_color=”#ffffff” rounded=”true”]Need to start tagging links, but concerned about the learning curve? Try our easy-peasy tracking app. No codes, minimal learning, no manual work.[/callaction]

